导入自定义svg文件
说明
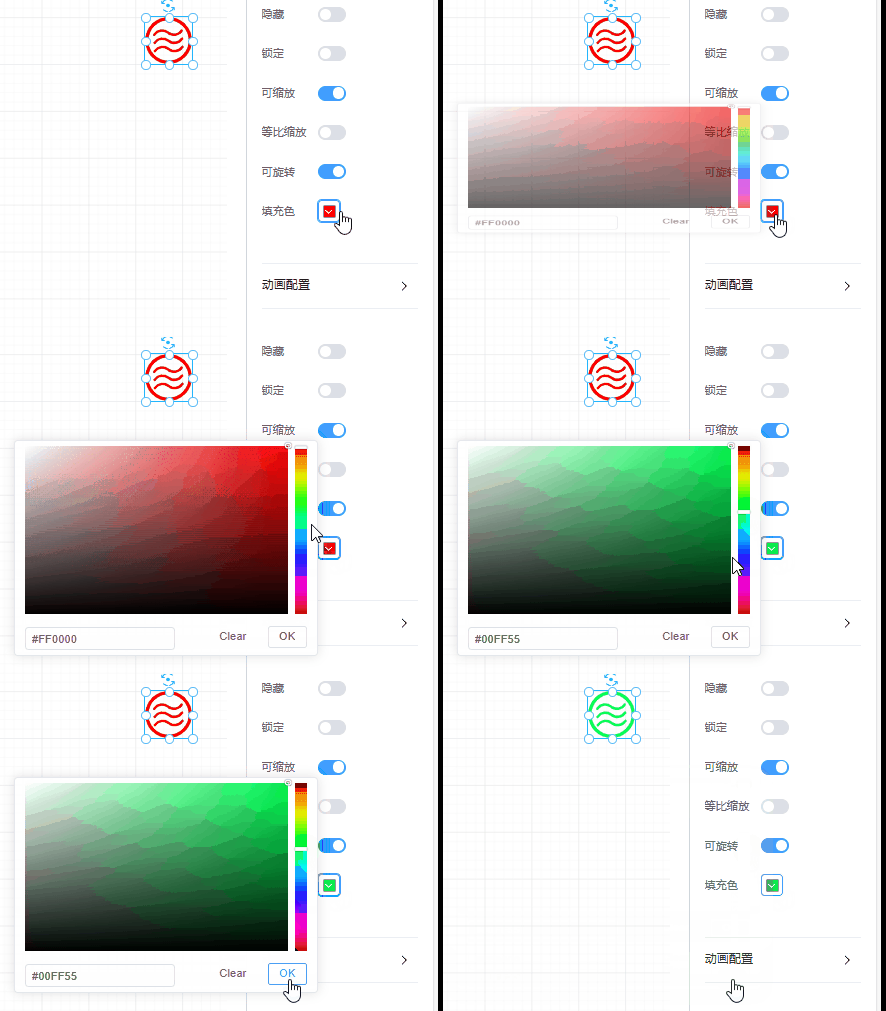
我们直接导入svg文件的时候,创建出来的图形库所有节点的属性都是统一设置的,比如说示例demo,我改了fill填充色,不管是圆形还是三条线的填充色都会同时变化,如下图

当我们需要自行去控制每个svg节点的属性时,就需要将svg文件封装成vue组件,注册到maotu中
创建自定义svg组件
WARNING
请注意:template里面不要写注释,这个文件的style也不要写scoped,因为xml语法要求比较严格,多余的字符可能会被错误解析
vue
<template>
    <svg
      width="557"
      height="554"
      xmlns="http://www.w3.org/2000/svg"
      xmlns:xlink="http://www.w3.org/1999/xlink"
      version="1.1"
    >
      <g>
        <path
          :fill="props.circleFill"
          d="m279,38.19467a238.80533,238.80533 0 1 1 -238.80533,238.80533a238.80533,238.80533 0 0 1 238.80533,-238.80533m0,-38.528a277.33333,277.33333 0 1 0 277.33333,277.33333a277.33333,277.33333 0 0 0 -277.33333,-277.33333z"
          id="circle1"
        />
        <path
          id="line1"
          :fill="props.pathFill1"
          d="m436.15733,143.928a14.67733,14.67733 0 0 0 -12.8,7.44533a96,96 0 0 1 -137.10933,24.66134a125.09867,125.09867 0 0 0 -188.032,24.14933a14.208,14.208 0 0 0 -1.28,2.13333a5.80267,5.80267 0 0 0 -0.66133,1.408a14.656,14.656 0 0 0 24.14933,15.68a6.272,6.272 0 0 0 1.28,-1.49333a96.832,96.832 0 0 1 13.248,-16.49067a95.76533,95.76533 0 0 1 124.62933,-9.30133a125.07733,125.07733 0 0 0 189.26934,-26.176a5.824,5.824 0 0 0 0.68266,-1.49333a14.63467,14.63467 0 0 0 -13.44,-20.43734l0.064,-0.08533z"
        />
        <path
          v-if="props.showLine2"
          id="line2"
          :fill="props.pathFill2"
          d="m440.15733,239.928a14.67733,14.67733 0 0 0 -12.8,7.44533a96,96 0 0 1 -137.10933,24.66134a125.09867,125.09867 0 0 0 -188.032,24.14933a14.208,14.208 0 0 0 -1.28,2.13333a5.80267,5.80267 0 0 0 -0.66133,1.408a14.656,14.656 0 0 0 24.14933,15.68a6.272,6.272 0 0 0 1.28,-1.49333a96.832,96.832 0 0 1 13.248,-16.49067a95.76533,95.76533 0 0 1 124.62933,-9.30133a125.07733,125.07733 0 0 0 189.26934,-26.176a5.824,5.824 0 0 0 0.68266,-1.49333a14.63467,14.63467 0 0 0 -13.44,-20.43734l0.064,-0.08533z"
        />
        <path
          id="line3"
          :fill="props.pathFill3"
          d="m444.15733,336.928a14.67733,14.67733 0 0 0 -12.8,7.44533a96,96 0 0 1 -137.10933,24.66134a125.09867,125.09867 0 0 0 -188.032,24.14933a14.208,14.208 0 0 0 -1.28,2.13333a5.80267,5.80267 0 0 0 -0.66133,1.408a14.656,14.656 0 0 0 24.14933,15.68a6.272,6.272 0 0 0 1.28,-1.49333a96.832,96.832 0 0 1 13.248,-16.49067a95.76533,95.76533 0 0 1 124.62933,-9.30133a125.07733,125.07733 0 0 0 189.26934,-26.176a5.824,5.824 0 0 0 0.68266,-1.49333a14.63467,14.63467 0 0 0 -13.44,-20.43734l0.064,-0.08533z"
        />
      </g>
    </svg>
  </template>
  <script setup lang="ts">
  const props = defineProps({
    id: String,
    circleFill: String,
    pathFill1: String,
    pathFill2: String,
    pathFill3: String,
    showLine2: Boolean
  });
</script>将以上vue代码片段另存为custom-demo.vue,放到您项目的src/components目录下
将自定义svg组件注册到mt-edit
和注册vue组件的方式一样,因为自定义svg文件本质上也是vue组件
vue
<template>
    <div style="width: 100%;height: 100vh;">
        <mt-edit></mt-edit>
    </div>
</template>
<script setup>
import { MtEdit, leftAsideStore } from 'maotu';
import 'maotu/dist/style.css';
import { getCurrentInstance } from 'vue';
import CustomDemo from '../../src/components/custom-demo.vue';
const instance = getCurrentInstance();
instance?.appContext.app.component('custom-demo', CustomDemo);

leftAsideStore.registerConfig('自定义svg', [
{
    id: 'custom-demo',
    title: '自定义svg',
    type: 'custom-svg',
    thumbnail: '/svgs/demo.svg',
    props: {
      circleFill: {
        type: 'color',
        val: '#FF0000',
        title: '圆颜色'
      },
      pathFill1: {
        type: 'color',
        val: '#00FF00',
        title: '线1颜色'
      },
      pathFill2: {
        type: 'color',
        val: '#0000FF',
        title: '线2颜色'
      },
      pathFill3: {
        type: 'color',
        val: '#FFFF00',
        title: '线3颜色'
      },
      showLine2: {
        type: 'switch',
        val: true,
        title: '显示线2'
      }
    }
  }
]);
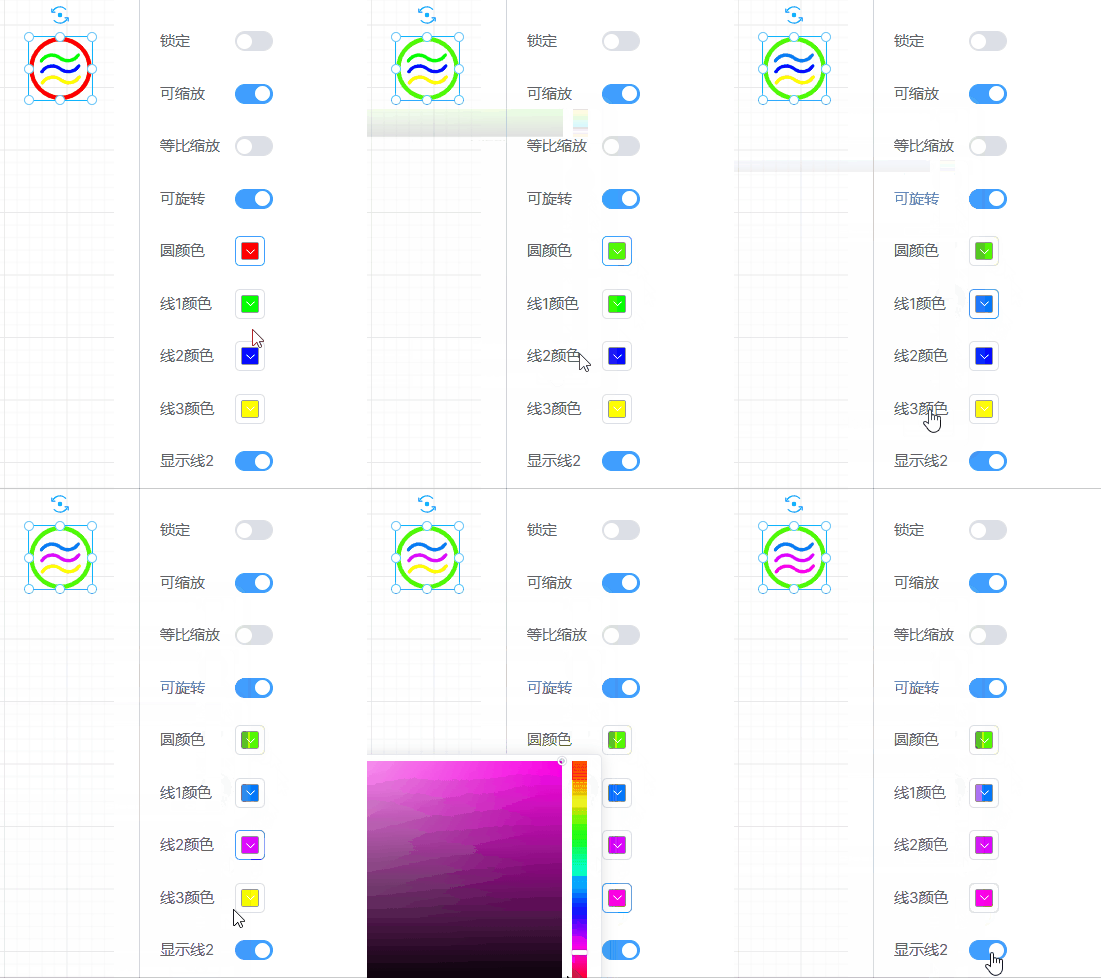
</script>然后我们会发现左侧图形库已经有了我们刚刚导入的自定义svg组件,我们不仅可以控制圆和三条线的颜色,甚至可以控制第二条线是否显示,这在封装类似于开关这种图库的时候非常有用 
有关于registerConfig函数的各项参数说明,请查看导入细节